


Wood Stabilizing

As woodturners, we tend to hold on to every last scrap of wood in the shop. Often times, we find a beautiful piece of wood that is just too soft or punky to turn. These are the pieces we reluctantly throw away since they can’t be used. Or can they? We’ve all seen commercially stabilized blanks for sale, but now there are products available to stabilize your own blanks at home, and it’s easier than you might think. And with a range of dyes and scents to choose from, you can enhance the wood in ways you never thought possible. Let’s get started.
What is wood stabilizing?
The basic principle of wood stabilizing is to take a piece of soft or punky wood and inject it with resin to create a stable, hardened wood blank that is safe to turn. The resin displaces air pockets throughout the grain structure, creating a dense blank that is nearly impervious to moisture changes and can be polished to a high gloss.

Preparing the wood blanks
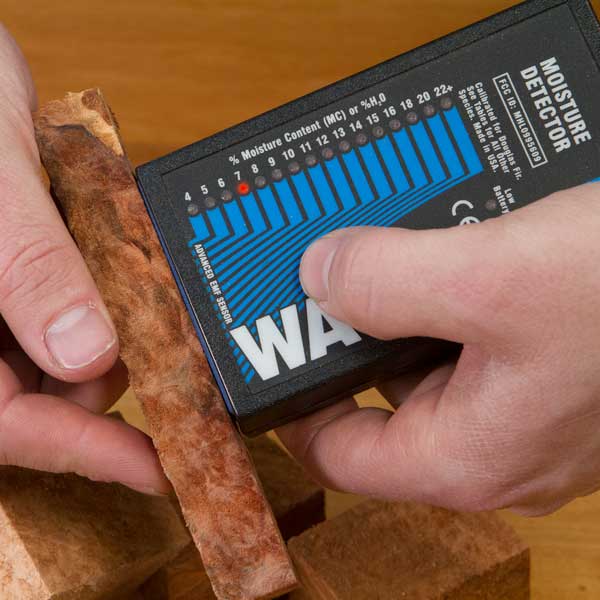
The first step in stabilizing a wood blank is to make sure the blank is dry. A wet blank cannot be stabilized. Use a moisture meter to verify that the moisture content of the wood is below 10%. To speed up the drying process, rough cut your blank slightly oversize and place it on a drying rack to allow airflow on all sides. You can also dry blanks in a kiln or oven. Give it time, drying too fast will cause the blank to crack.
Custom Blanks (Optional)
One of our favorite things about stabilizing is the ability to dye wood blanks. It’s easy, and the options are endless. Using Stick Fast coloring dye, mix the color and resin at a ratio of ¼ tablespoon of coloring dye per 1 quart of resin. Mix thoroughly. Add more dye for a more vivid color.

Get ready to stabilize
Now that the blanks are nice and dry it’s time to stabilize. In this article we will be using the Holdfast Vacuum Stabilization Chamber Kit. This kit includes a stainless steel pot, inner chamber, anti-float plate, and vacuum generator. For this example, we’ll be leaving the wood natural.
Place the inner chamber inside the stainless steel pot. Place the wood blanks into the inner chamber and use the anti-float plate to keep the blanks submerged during stabilization. Fill the inner chamber with enough resin to completely submerge the blanks with 1” of resin on top of the blanks. Don’t worry, we can re-use the resin again and again.

Seal the chamber and attach the vacuum lines. Turn the vacuum generator on at the lowest setting and slowly increase the power to full. This prevents the resin from foaming too quickly and making a big mess. Depending on the thickness and type of blank, the vacuum should be run from 30 minutes to an hour. Initially the resin will foam due to air being pulled from the blanks. Continue the vacuum until you see very few air bubbles exiting the blank. Tapping or gently shaking the chamber helps release air more quickly from the blank.
Once the bubbling is minimal or has stopped, turn off the vacuum generator and carefully remove the lid. You may notice that not much resin seems to have been vacuumed into the wood. This is because the wood does not soak up much resin when under vacuum, it soaks up the resin when the atmospheric pressure is allowed back into the chamber. Leave the blanks to soak in the resin for a half hour or so. After soaking, remove the anti-float plate and check that the blanks do not float. If they float, repeat the vacuum and soaking process. Once the blanks no longer float, remove the blanks from the chamber and wipe off the excess resin. Pour the leftover resin into a jar for re-use. Clean the chamber pot with soap and water before the resin begins to gum up. Trust us, it’s worth the effort now.

Curing the blanks
Now that our blanks are full of resin, it’s time to cure the resin. Wrap each blank individually in aluminum foil. Place the wrapped blanks into an oven pre-heated to 200 degrees F. We highly recommend using an inexpensive toaster oven rather than your kitchen oven. Your family will thank you! Use an oven thermometer to make sure the temperature is accurate, too little or too much heat will ruin the curing process.

Pen blank size pieces should be baked for 30 minutes to an hour. Larger pieces will require more time. Check the blanks after 30 minutes to see if the resin has cured. Cured resin will be hard and look crystallized. If the resin is still wet, put the blanks back into the oven until the resin is completely cured.
Now that the resin is cured, let the blanks rest for 24 to 48 hours before turning. Take care when turning your stabilized blank, the resin makes the blank more brittle and it should be turned like an acrylic blank.
In this article you learned how to properly stabilize your own soft and punky wood blanks like the pros! We used the following items to stabilize our blanks:
Supplies Used:
- Holdfast Vacuum Stabilization Chamber Kit
- Stabilizing Resin – Stick Fast or Cactus Juice
- Coloring Dye for Stabilizing Resin
- Safety equipment – Nitrile Gloves, Eye Protection
- Air Compressor
- Oven (capable of 200 degrees F)
If you have any questions about stabilizing wood blanks, please call our technical support team at 1-800-551-8876.
Featured posts


